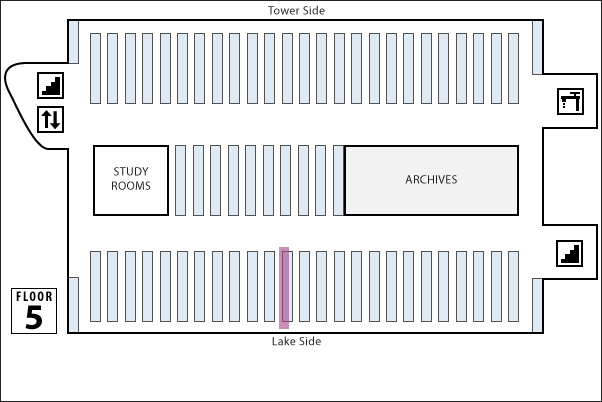
Sample Map
I'm setting this repo as archived. A newer version of the stack map system may be found as part of Ithaca College's Primo VE customization package. Updated documentation is available here.
Find the Code Here: Primo old UI (non-Angular) | Primo AngularJS 1 UI
Some of the language and code samples on this page specifically applies to the "old" (non-Angular) UI.
As online access to library resources has become the norm, the ability to find items in a library's stacks using a call number seems to be on the decline among students. In order to address this problem, Ithaca College Library has implemented a tool in our discovery system to assist students by displaying a map indicating the location of each physical library item.
Sample Map
We are often asked about how to implement such a tool. Of course, we're happy to share our code with anyone who wants it, but the programming is only one part of the map system. On this page, I hope to document the system as a whole, including the organizational challenges along with the technical ones. This will help you decide if such a project is worthwhile for your institution and to what extent the code provided here will work for your needs.
Because of the host of variables involved in a mapping system, this is not "plug and play" software. You will need at least a little JavaScript experience in order to customize and implement it. In particular, you will need to create your own version of js/mapData.js (instructions follow) and you will most likely need to edit js/maps.js, especially if your stack designations differ significantly from those used at Ithaca College.
Before you even open your code editor, there are a lot of decisions to make. Most libraries have multiple locations. At Ithaca College, we have about eighteen of these, including archives, general stacks, multimedia collection, periodicals, newspapers, reference, reserves, over-sized, etc. For the purposes of the mapping project, we divided these into two groups based on the type of mapping they would need.
Static locations are those that need mapping only to the collection level. These include collections that are small enough that just getting the student to the collection is adequate (e.g., newspapers, popular periodicals) as well as collections that are "closed stack," requiring interaction with a staff member for the student to access an item (e.g., multimedia, reserves). In the case of the closed stack locations, we decided that the map should simply direct students to the appropriate service desk.
Dynamic locations are those for which the map will specify a more specific location within the collection. This will include a library's general stacks area. At Ithaca College, we also decided to dynamically map our music book collection and our bound periodicals collection.
We decided that for the dynamic locations, we would specify location to the level of one side of a shelving unit. Anecdotal evidence from staff members indicated that students who had trouble finding an item were usually in the wrong area of the stacks altogether, so we felt that specifying location to the level of stack face should be adequate. In deciding on the level of granularity for your map data, remember that collections move. The more granular you make your data, the more frequently you will have to update it to account for shifting in the stacks.
A mapping system will be most effective if it is coupled with clear, highly visible stack signs that unambiguously designate the location in whatever language is used in the maps. As mentioned above, at Ithaca College we have three dynamically mapped locations, general stacks, music stacks, and bound periodicals. We numbered the shelving units as G1, G2, etc. for the general stacks, and used M and P, respectively, to prefix numbers for the music and periodical stacks. The stacks in all three of these collections are oriented north-south, so we indicate the side of a shelving unit with "east" or "west." "M11.e," for instance, would indicate the east side of the eleventh shelving unit in the music collection.
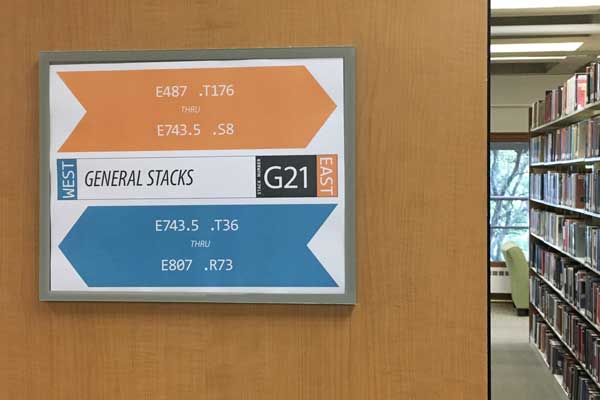
Sample Stack Sign
For each "mapping unit" (in IC's case, a mapping unit is one stack face), you'll need to collect beginning and end call numbers. This data can be recorded in a JSON-ish manner as follows:
var musicStacks = [
    {
        "id" : "3.M3.w",
        "start" : "M1 .A13 A4",
        "end" : "M2 .R2384"
    },
    {
        "id" : "3.M3.e",
        "start" : "M2 .R2386",
        "end" : "M3 .H26"
    },
    {
        "id" : "3.M4.w",
        "start" : "M3 .H262",
        "end" : "M3 .S3912"
    },
    // and so forth
];
Notice the construction of the id values. They have the format:
[floor].[stack designation].[side of shelving unit]The code in js/maps.js assumes that you are using this triplet system for the ids. If you are not, you will need to modify the buildMap function accordingly.
Put this and other location information in a file called mapData.js. You'll need an array like the one above for each of your dynamically mapped locations.
You'll need to create a map of each floor of your library. Try to keep these maps simple, emphasizing the stacks and any landmark features (stairwells, pillars) that will help students to orient. The map need not be to scale: it just needs to show your locations clearly, with enough room for a "highlight" effect to be applied to emphasize a single mapping unit. Save your maps as png files in the img/mapImages directory, using the naming scheme floor_[number].png.
One you have your map image files completed, you'll need to define the areas that you want highlighted for each location. Open one of your floor maps in Adobe Photoshop and activate the "info" panel. This will display x and y values for the point where your cursor is located on the image and will display height and width for any shape that you highlight with the cursor.
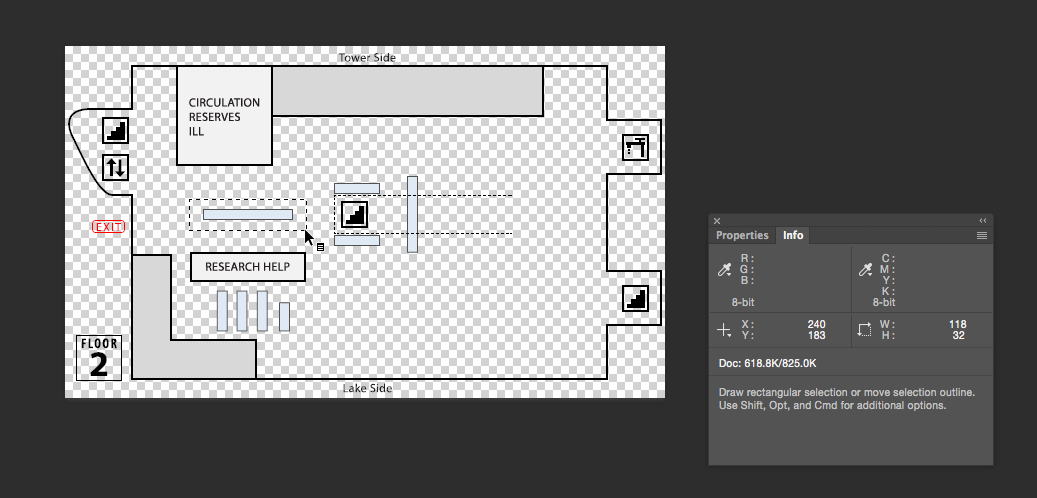
Determining map coordinates with Photoshop
You will need x, y, height, and width values for each of your static locations and for each of the mapping units within your dynamic locations. The x and y coordinates are for the top left corner of the rectangle.
Your static locations can be described in your mapData.js file as follows:
var staticLocations = {
    "Popular Reading" : {
        "id" : "2.popReading",
        "x" : 133,
        "y" : 156,
        "width" : 102,
        "height" : 23
    },
    "Newspapers" : {
        "id" : "2.newspapers",
        "x" : 264,
        "y" : 131,
        "width" : 55,
        "height" : 73
    },
    "Reference Desk" : {
        "id" : "2.refDeskStack",
        "x" : 128,
        "y" : 236,
        "width" : 110,
        "height" : 57
    },
    "Popular Periodicals" : {
        "id" : "2.popPer",
        "x" : 323,
        "y" : 135,
        "width" : 22,
        "height" : 67
    },
    // and so forth
};
Again, the numeric prefixes for the id values indicate the floor.
Add x, y, height, and width values to the arrays that you already established for the dynamic locations:
var musicStacks = [
    {
        "id" : "3.M3.w",
        "start" : "M1 .A13 A4",
        "end" : "M2 .R2384",
        "x" : 403,
        "y" : 230,
        "height" : 84,
        "width" : 10
    },
    {
        "id" : "3.M3.e",
        "start" : "M2 .R2386",
        "end" : "M3 .H26",
        "x" : 394,
        "y" : 230,
        "height" : 84,
        "width" : 10
    },
    {
        "id" : "3.M4.w",
        "start" : "M3 .H262",
        "end" : "M3 .S3912",
        "x" : 384,
        "y" : 230,
        "height" : 84,
        "width" : 10
    },
    // and so forth
];
You should have a JavaScript array like the one above for each of your dynamic locations.
The final ingredient for a complete mapData.js file is a messages array that contains any text that you would like displayed for particular statuses or location.
var messages = {
    "popReading" : "Located on the low shelves just inside the Library on the 2nd floor.",
    "newspapers" : "Located on the low shelves on either side of the staircase on the 2nd floor.",
    "askALibrarian" : "Ask at the Research Help Desk.",
    "mapFail" : "Odd. We can't find that. Ask at the Research Help Desk.",
    "unavailable" : "This item is not currently available.",
    // and so forth
};This would be a good time to look over maps.js and see if there are any changes that need to be made to match your particular case. The file is commented in some detail to help you with this process.
For instance, if your id designations differ from the system described above at for Ithaca College, you'll need to edit the first 20 lines or so of the buildMap function, where the id is parsed.
You'll almost certainly need to edit the switch statment that begins around line 97 to allow for your particular set of dynamic locations.
At this point, you might want to make a copy sample.html and substitute my data with some of your own. This will let you test your system locally without worrying about the complexities of whatever catalog or discovery system you may be using. Use the simple markup as in the original file:
<div class="catalogItem">
    <h2 class="title">Bleak House</h2>
    <div class="holding">
        <div class="location">General Stacks</div>
        <div class="callNumber">PR4556 .A1 1977</div>
        <div class="availability">Available</div>
   </div>
</div>
Create test cases for items in static and dynamic locations, on different floors, etc. and see how the system works.
The next step is to get familiar with the HTML of your catalog or discovery layer interface. Use your browser developer tools to discover what markup corresponds to a "holding" in the simplified HTML above. Once you've determined that, you can edit line 79 to control the appearance of the "Where?" link. You might want to add some logic for cases where no "Where?" link is desired (e.g., ebooks).
You'll also need to edit the jQuery selectors on lines 84-86 to match the markup of your system.
Specific notes for the Ex Libris Primo discovery system can be found in the README.